
You probably know that keyboard shortcuts are a great way to work faster in the software you use regularly. The less time you spend hunting for the right option with your mouse, the more efficiently you’ll work.
And while Microsoft Excel has plenty of built-in keyboard shortcuts, you can also create your own shortcuts with a few methods. We’ll show you how.
Quick Access Toolbar Shortcuts
The Quick Access Toolbar is a strip of icons at the top of the Excel window that holds a number of handy shortcuts. While it starts out with a few options, like Save, Undo, and Redo, you can add many more icons to this bar.
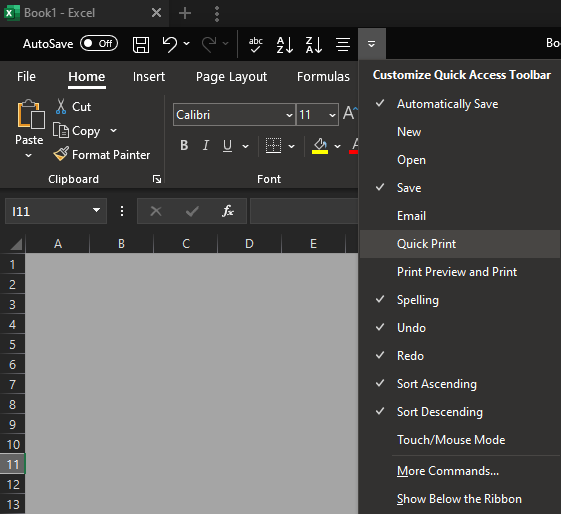
To change what appears on the Quick Access Toolbar, click the downward-facing arrow to the right of the icons on the bar (above the File, Home, etc. tabs on the Ribbon).
Here you’ll see a handful of additional commands you can add to the bar, like New, Email, and Quick Print. Click any of these to add that item to the Quick Access Toolbar as a new icon.
More Toolbar Shortcut Options
While the shortcuts on the menu are useful, they’re just the start of the options available to you. Choose More Commands to bring up a window with many more choices.
Here, Excel shows your current toolbar contents on the right side and all the possible options on the left side. Above the left box, you’ll see the selection defaults to Popular Commands, but you can change this to another option, like Commands Not in the Ribbon or even All Commands.
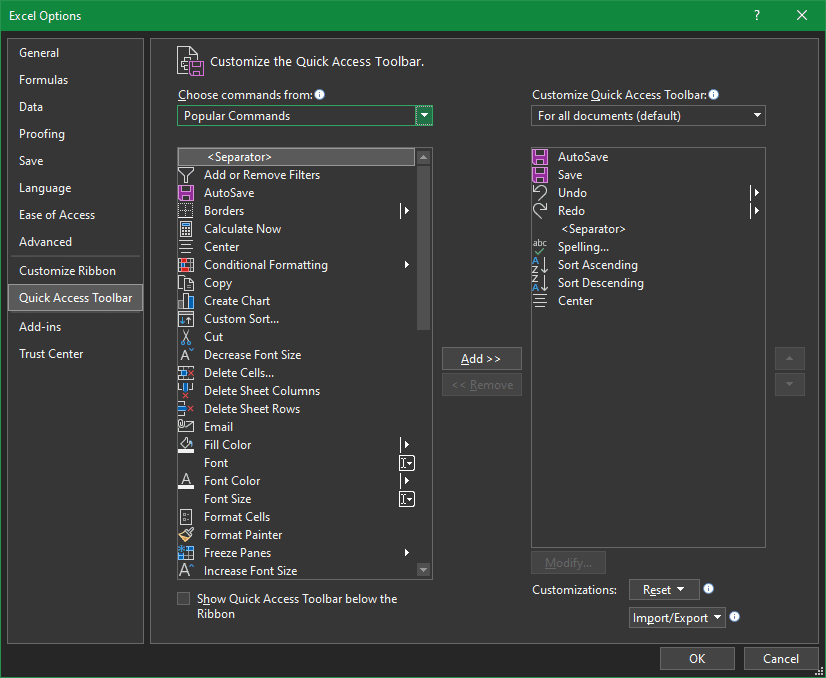
We don’t recommend showing everything at once, as there are a ton of commands that will quickly become overwhelming. Once you’ve picked a category, scroll through the left list. When you find something you want to add as a shortcut, select it and hit the Add>> button to put it on your toolbar.
Repeat this until you’ve added everything you want (keep an eye out for the Separator option, which can help with organization). Now, you can use the arrow buttons to the right of your toolbar contents box to rearrange the icons. If you don’t want an item, highlight it and choose Remove.
You can also use the dropdown box above your shortcuts to choose whether these shortcuts should apply to all Excel workbooks, or only the current one. To back up your work, click the Import/Export button at the bottom to export your setup for safekeeping.
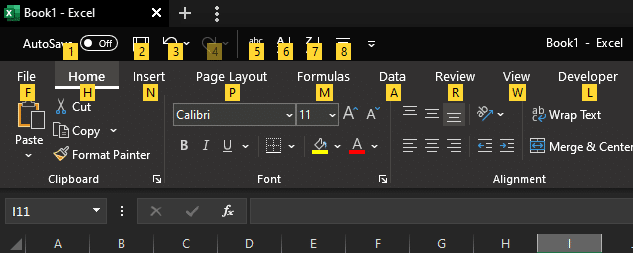
Hit OK when you’re done, and the toolbar will update with your changes. Now, to access these commands with your keyboard, simply hit the Alt key. This will show a key next to each item on the Ribbon. To use the shortcuts on the Quick Access Toolbar, just hit the corresponding number key.
Make Your Own Excel Macros
Macros are a feature for Excel power users that let you record a number of steps and play them back in exactly the same way. These lets you automate repetitive tasks and are quite convenient.
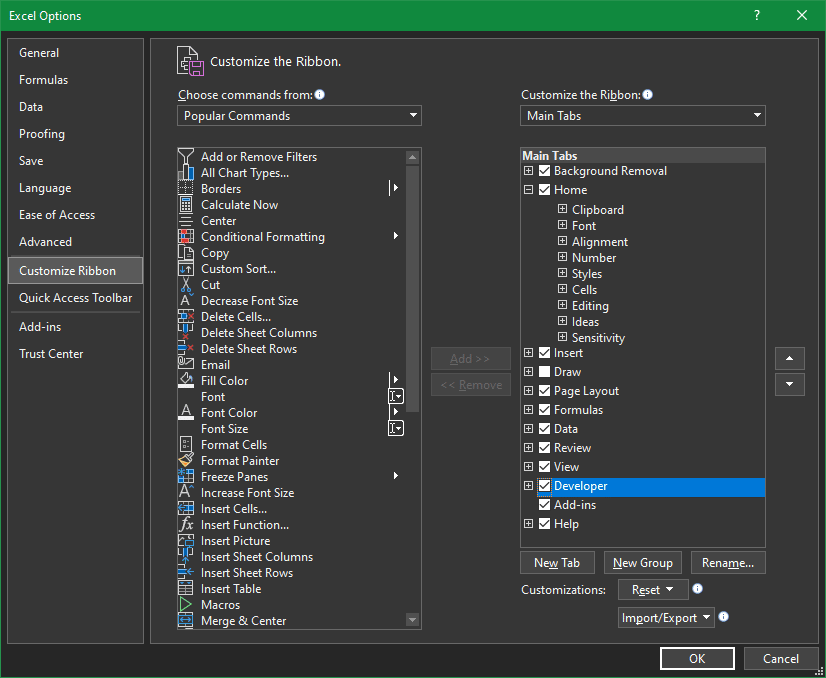
To use macros, you’ll first need to enable a tab on the Ribbon that’s hidden by default. Right-click anywhere on the Ribbon at the top of the page and choose Customize the Ribbon. This will bring up a new window.
On it, find the Developer item in the right box, and check it. Once you hit OK, you’ll see a new Developer tab on the Ribbon.
Now, select the Developer tab and you’ll see a Code section on the left side. To create a new macro, hit Record Macro. In the resulting window, give it a descriptive name.
Excel also asks you for a shortcut key for the macro here. Enter a key to use with Ctrl (you can also hold Shift to add that key into your combination) that you can use to activate it easily. Keep in mind that if you override a default keyboard shortcut here (such as Ctrl + S), it will run your macro instead of its original function.
Finally, store the macro in Personal Macro Workbook if you want to use it across many files. Otherwise, the default This Workbook will only work in the current document.

Recording Your Macro
After you hit OK on the macro creation window, the new macro will start recording. Every action you take is recorded, so perform steps in exactly the way you want the macro to run. For example, you could select cell E5, type the word “example” into it, center the contents, and then apply a blue background. The complexity of macros is up to your needs.
Once you’re done, hit the Stop recording button in the Code section (the Record Macro button turns into this while recording). Now you can use the keyboard shortcut you chose to run the macro at any time.
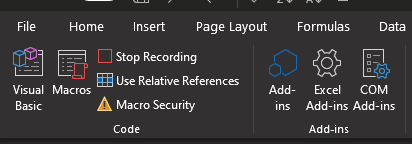
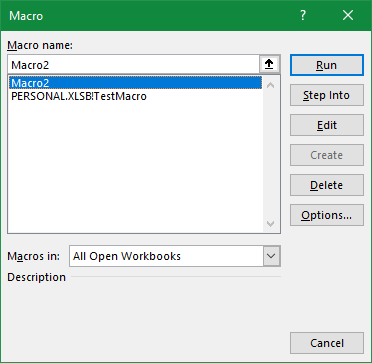
To view the macros you’ve created, click the Macros button in the Code section. Select an existing macro and you can use Edit to change it, though this requires editing the Visual Basic code underlying the macro. Options will let you change the shortcut key for the macro.
If you’d like, you can add your new macros to the quick access toolbar. In the steps described earlier, choose Macros from the dropdown box of commands. This gives you another keyboard shortcut to fire macros from.
Endless Excel Shortcuts
With these two methods, you can go far beyond the default shortcuts included with Microsoft Excel. Take advantage of them to keep your most-used functions just a few key presses away, and you’ll spend less time on busywork.
For more Excel tips, we’ve also covered how to copy and paste text without formatting.