
The Windows taskbar is an important tool for navigating around your computer, but you might not have taken the time to customize it. From removing unnecessary icons to making the taskbar behave differently, there are a lot of tricks that help you work more efficiently with it.
Let’s look at some useful ways to improve the taskbar on Windows 10.
1. Hide Unnecessary Taskbar Icons
The Windows 10 taskbar includes a lot of clutter by default. You can safely hide some of this to make more space for icons you actually use.
First is the large search bar on the left side. Right-click on this (or any empty area of the taskbar) and highlight Search to choose what shows for it. The default is Show search box, which is huge. Show search icon replaces it with a normal-sized icon, or you can choose Hidden if you don’t want it at all.
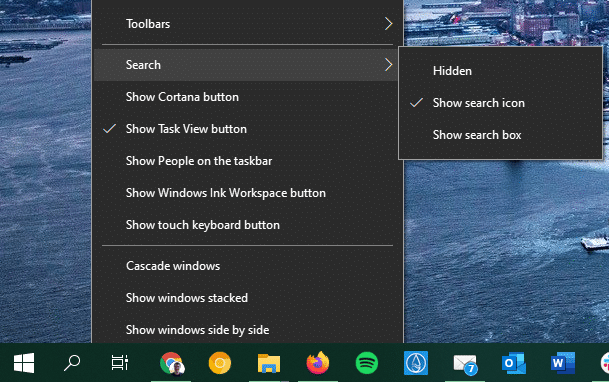
Even if you hide the icon, you can still open the search menu with Win + S, or do a quick search just by hitting Win and typing. If you don’t care about Cortana, uncheck Show Cortana button too.
For the right side of the taskbar, uncheck the Show People on the taskbar field to hide the People shortcut if you don’t use that. This is an underutilized Windows feature that grants you quick access to the people you contact most, but it only works with a handful of apps. And while the options under Toolbars can be helpful, if you don’t use them, uncheck them to regain additional room.
2. Move the Taskbar’s Position
Most people stick with the default option of having the taskbar at the bottom of the screen, but you can actually move it to any of the four edges.
Doing this can reduce strain on your wrist—it’s more comfortable to move a mouse to the side than to move up and down all the time. Plus, with today’s widescreen monitors, having the taskbar on the left or right side of the screen takes up less screen space than when it’s at the top or bottom.
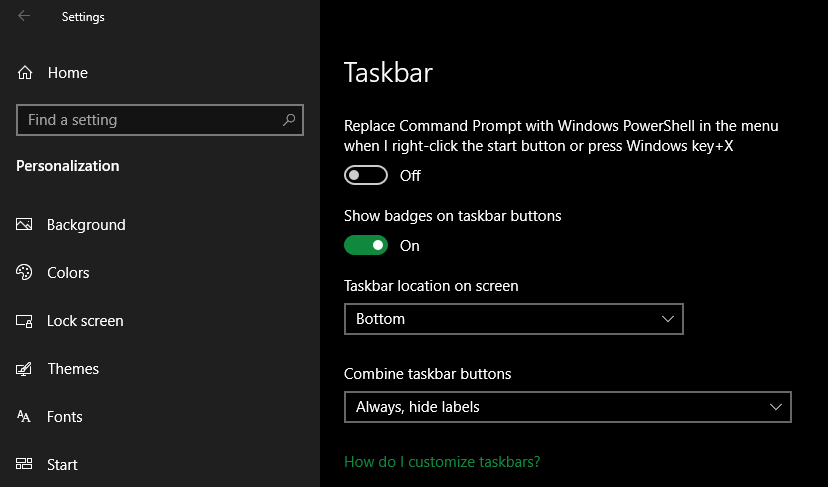
To change your taskbar position, go to Settings > Personalization > Taskbar. You can choose one of the four sides under Taskbar location on screen. If you want, you can disable the Lock the taskbar slider, which lets you click and drag the taskbar around the screen at will. But this is easy to activate by mistake, so you may want to avoid it.
3. Auto-Hide the Taskbar
If you don’t use the taskbar very often, or want to maximize the available screen space, then you can hide the taskbar and only show it when needed. On the same menu as mentioned above (Settings > Personalization > Taskbar), enable the Automatically hide the taskbar in desktop mode slider.
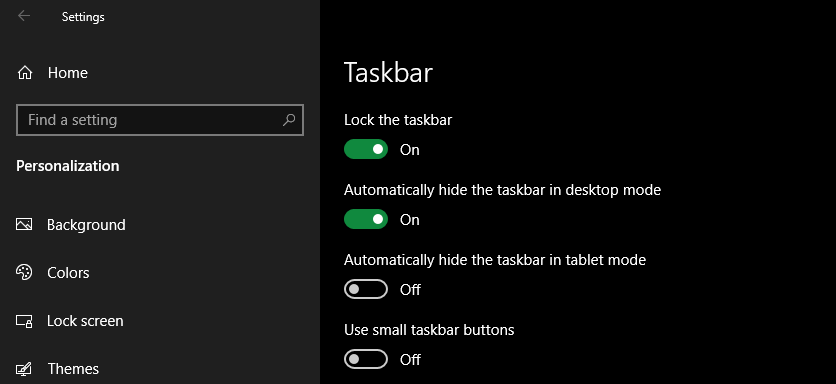
With this option, the taskbar will collapse when you’re not actively using it. To show the taskbar, just mouse over the bottom of the screen (or whatever side you’ve set your taskbar to appear on, as mentioned above). You can still use taskbar shortcuts even when it’s not showing, such as Win + 1 to open the first icon on your taskbar (and so on up to Win + 9).
Note that when you using this mode, the taskbar will sometimes get stuck open. This happens when an app needs your attention, such as getting a ping in Microsoft Teams. Typically, switching to the app in question will make the taskbar hide normally again.
4. Control How the Taskbar Behaves Across Monitors
If you use two or more monitors with your computer, you can change the way that taskbar icons appear on them. To change these options, visit Settings > Personalization > Taskbar again, then scroll down to find the Multiple displays section.
Here, you can disable the Show taskbar on all displays to only show the taskbar on your primary monitor, if desired. Show taskbar buttons on is the other interesting option—it lets you set whether app icons should appear on every taskbar or not.
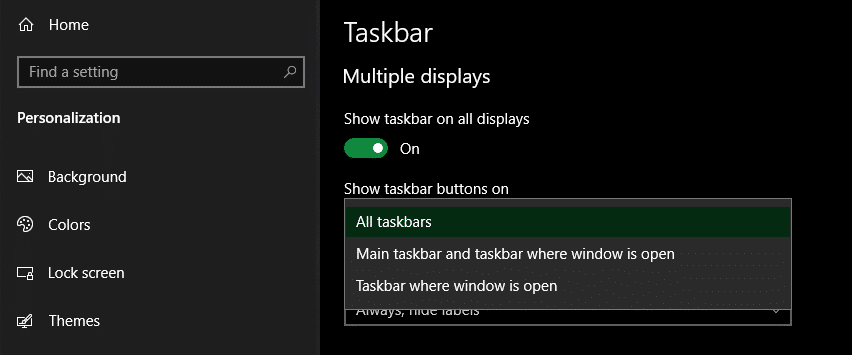
The default option is All taskbars, which shows the same view of all your taskbar icons on every monitor. Main taskbar and taskbar where window is open will show all items on your main taskbar, but on other monitors, you’ll only see icons for programs open on that display. And with Taskbar where window is open, program icons will only show on the taskbar for the display where they’re located.
If you find that your taskbar looks too cluttered on other monitors and only use a few apps on those, give this a try.
5. Customize System Tray Icons
At the far-right side of your taskbar sits the system tray, a section of icons that represent open programs and other functions of your PC like the volume. Since there are usually a lot of icons here, you can click the arrow to show the rest of them.
To customize which icons appear in the system tray, head back to Settings > Personalization > Taskbar and click the Select which icons appear on the taskbar text under Notification area. Here you can pick the icons that you want to appear there all the time—just turn the slider on for them.
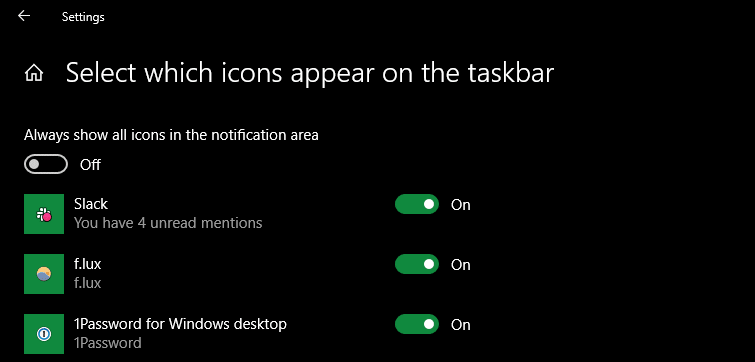
Turning the slider off for an entry will keep it in the “overflow” area accessible with the arrow icon. It’s handy to keep cloud storage services, or any apps where you want to check for notifications, here. Enable the Windows Explorer entry for an easy shortcut to safely eject USB drives.
Use the Turn system icons on or off to disable default Windows functions, like the Network icon or Volume. These are useful in most cases, though, so you may want to leave them on.
Get More From the Taskbar
These are just a few ways to make your Windows 10 taskbar more efficient. With room for the apps you use all the time and its location in a comfortable position, you’ll get more out of this Windows staple.
For more Windows navigation tips, why not learn about virtual desktops in Windows 10 next?